
Percussion Care and Information
Drum Tuning 101
Drums, like any instrument, need to be in tune to sound their best. Tuning isn't hard but it takes practice to get it right. There is no standard pitch that your drums should be tuned to. It is all personal taste. The following will get you started on your way to a great drum sound. Remember the more you tune your drums the better you will become. Practice tuning as often as you can.
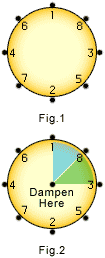
First we will cover lug tightening order. Place your drum on a towel or a stool to dampen the bottom head. When tightening the head it is best to tighten opposite lugs to get the drum to a general pitch. (Fig.1) The idea is to keep the tension of the head even all around the drum. Don't try to tension the head to final pitch at first. That will come later.
Next we want to get all the lugs to the same pitch. To do this place a finger in the center of the drum to dampen the head. Apply only light pressure as we want to dampen only. A light touch is all that is needed. Take a stick and tap the head by lug 1, about an inch from the rim. Listen to the pitch. Now tap by lug 8 in the same manner. Listen to that pitch. Adjust lug 8 to match the pitch of lug 1. (Fig.2) Once these two match in pitch move on and match lug 3 to lug 8. Continue this process all the way around the drum. Now flip the drum over and do the same thing to the bottom head.
Now it is time to decide if you like the pitch of one of the heads. If you do, adjust the other head to match the one you like best. Do this by turning all the lugs the same amount using the method shown in Figure 1. Once both heads are at the same pitch your drum will have its maximum sustain and projection. You may want to have the bottom head at a different pitch than the top head depending on your playing situation and preference. It's up to you.
A final note on drum sound. If you want your drums to sound like recordings, from your perspective, when you are playing, it won't happen. Recordings and miked drums sound completely different when all the processing equipment and amplification is used. The sustain and projection of your drums is needed when you are playing un-miked. Your audience will hear a different sound from their perspective than you do, especially when other instruments are playing. If you are miking your drums however, you may need to dampen them to get a better sound. Our drum dampening page will give one way to do this. My suggestion is: Miked = Dampen, Unmiked = No Dampening.
Down and Dirty Duct Tape Drum Dampening
It's Cheap, Quick and it Works!
There are times when you need to remove some of the ringing and overtones produced by your drum. There are numerous products available from many manufacturers to achieve this. However, here is a quick and cheap way to dampen your drums with a great amount of control. This method doesn't look that pretty but try it, I think you will be amazed.
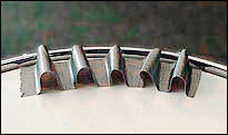
Take a section of duct tape about 12 inches long and make loops along the drum edge as shown in picture below. Put the loops on an area of the drum where you won't accidentally hit them. Now play the drum....WOW! Now try lifting an edge of the tape so the end is free and one loop is gone. Play the drum and hear the difference. Lift another loop and try again... etc. The fewer number of loops, the less the dampening. More loops, more dampening. You can cover the entire edge of the drum with loops if you want. This works on the bottom head too.
Take a section of duct tape about 12 inches long and make loops along the drum edge as shown in picture below. Put the loops on an area of the drum where you won't accidentally hit them. Now play the drum....WOW! Now try lifting an edge of the tape so the end is free and one loop is gone. Play the drum and hear the difference. Lift another loop and try again... etc. The fewer number of loops, the less the dampening. More loops, more dampening. You can cover the entire edge of the drum with loops if you want. This works on the bottom head too.